Thursday, 9 January 2014

Install and first look of Windows 8

Install and first look of Windows 8

You can download the 64-bit source from here and the 32-bit from here.

I will do a clean installation but:

If you are installing over Windows 7 or Vista you can keep accounts, files and settings.

If you are installing over Windows XP you can only keep accounts and files.

If you get the message "A required CD/DVD drive device is missing..... please inser it now", download the ISO again because yours is corrupted.


The installation looks pretty much like the Windows Server 2008 installation.


Now the Personalization. Give the computer a name.


I will just go with the Express Settings, but you can customize it as you wish.


I'm using a Windows Live ID to set up my account, but it is not required. If you don't have it just click on Don't want to log on with a Windows Live ID.


Type your password.


After that it will connect to your account and do the last configurations and you will see your new Start Menu.
Welcome to Windows 8!

Windows 8 - New Views, Customizations and Configurations

Windows 8 - New Views, Customizations and Configurations

So after you log on that's your first view. It's your start menu.


You can customize this view. If you right click in one of the shortcuts you will have some options. Right click on Stocks and you will have the option to make it smaller, to unpin it from there or to uninstall it.


If you select to make it smaller it will look like this:


To go to your Desktop, just click on the Desktop shortcut.

To go back to the previous screen (the start menu) guess what? Click on the Start Menu icon.


There are some new looks in the explorer windows. Now you have some tabs with commands available.
The picture below you can see it's the Home tab of the Libraries node.


Now that's the Home tab of the Computer node.


If you want to put a picture to your profile, first put the picture you want in C:\Users\Username\User Tiles then in the start menu click on your user name and click on Change user tile.


That will take you to the Control Panel. In Personalize, click on User Tile, browse and select the picture.

Now when you go back to the Home Page (start menu) you can see your picture displayed.


If you can't find out how to go back just move your mouse to the left bottom corner and a list with some options will show up. Click on Start.

Now let's create a Picture password. Pretty cool feature. Click on Control Panel, Users and Create a picture password.


Type your password and click on Choose picture.


Select a picture and then click on Use this picture.


Now there's a 3 steps where you have to make a dot, line or circle in the picture. Make sure you remember the direction you made the lines or circles. After you confirm what you have done in the first 3 steps you should get a Congratulations screen. Now you can use the picture password next time you log in.


After you install applications, if the application places a shortcut to the start menu, it will be available for you in the far right of the Home Screen (start menu). You can drag it to any place you want.

Sequencing Adobe Photoshop CS4 - Recipe

Sequencing Adobe Photoshop CS4 - Recipe

I'm using the Sequencer 4.6 SP1 and I'm going through the process of sequencing Adobe Photoshop CS4.

Start the sequencer and select Create a New Virtual Application Package.


Now select Create a Package (default) and click Next.


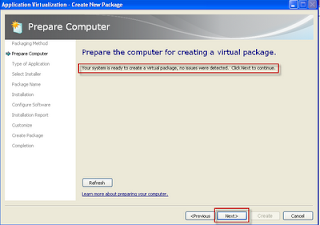
Make sure there is no warnings and click Next again.


Select Standard Application (default) and click Next.


Browse to where the setup.exe is located, select it and click Next.


Now type the Package Name and click Next.


Type the serial number, click Next, Accept the License, Change the Location to reflect the virtual folder in the Q drive and Click Install.


When it's finished click Exit. Then select I am finished installing and click Next.


Now select Adobe Bridge CS4 and Photoshop CS4, click Run Selected.


When Bridge opens, click No and then close it.


Close Photoshop.


Ignore the issues with drivers. Driver can't be virtualized. If you want you can install them latter manually. Click Next.


Select Customize. Further confitgure the virtual application package and click Next.


Now you can exclude anything you don't want the user to see. What I do is editting each shortcut to point to the Start Menu/Programs/Adobe instead of Start Menu/Programs. To do that expand each program, select shortcuts and click Edit Locations... After you finish click Next.


Select Bridge CS4 and Photoshop CS4 and click Run Selected.


Close Bridge. On Photoshop, click Help and Updates... After it finds all updates, click to update. When the update is finished click on preferences and untick the Automatic Update. Then Click next.


Select the OS you want it to be restricted to.


Select Continue to modify package without saving using the package editor and click Next.


Ignore the issues with the driver again and click Close.


Now click Tools, Options and select Allow all named objects and COM objects to interact with the local system and click OK.


Save it and you are done!


Proxy Auto-Configuration (PAC) scripts

Proxy Auto-Configuration (PAC) scripts

PAC files are written in JavaScript. They are pretty handy if you have more than 1 proxy server.

The basic structure is:

function FindProxyForURL(url, host){
return "PROXY proxyserver:8080";}

But if you have intranet sites you don't want them to go through the proxy. Then you can add some exceptions and make all plain hostnames bypass the proxy.

function FindProxyForURL(url, host){

if (isPlainHostName(host))
  return "DIRECT";

var resolved_ip = dnsResolve(host);
 if (isInNet(resolved_ip, "10.0.0.0", "255.0.0.0") ||
  isInNet(resolved_ip, "172.16.0.0",  "255.240.0.0") ||
  isInNet(resolved_ip, "192.168.0.0", "255.255.0.0") ||
  isInNet(resolved_ip, "127.0.0.0", "255.255.255.0"))
  return "DIRECT";

return "PROXY proxyserver:8080";}

You can also add any address or domain as an exception.

function FindProxyForURL(url, host){

if (isPlainHostName(host))
  return "DIRECT";

if (shExpMatch(url,"*google.com*") ||
     shExpMatch(url,"*microsoft.com*"))                 
  return "DIRECT";

var resolved_ip = dnsResolve(host);
 if (isInNet(resolved_ip, "10.0.0.0", "255.0.0.0") ||
  isInNet(resolved_ip, "172.16.0.0",  "255.240.0.0") ||
  isInNet(resolved_ip, "192.168.0.0", "255.255.0.0") ||
  isInNet(resolved_ip, "127.0.0.0", "255.255.255.0"))
  return "DIRECT";

return "PROXY proxyserver:8080";}

If you have more than 1 proxy you can specify all of them. In the next example it will try the first proxy, if it is unavailable it will try the second, if it is also unavailable it connects direct to the internet.

function FindProxyForURL(url, host){

if (isPlainHostName(host))
  return "DIRECT";

if (shExpMatch(url,"*google.com*") ||
     shExpMatch(url,"*microsoft.com*"))                 
  return "DIRECT";

var resolved_ip = dnsResolve(host);
 if (isInNet(resolved_ip, "10.0.0.0", "255.0.0.0") ||
  isInNet(resolved_ip, "172.16.0.0",  "255.240.0.0") ||
  isInNet(resolved_ip, "192.168.0.0", "255.255.0.0") ||
  isInNet(resolved_ip, "127.0.0.0", "255.255.255.0"))
  return "DIRECT";

return "PROXY proxyserver:8080; PROXY proxyserver2:8080; DIRECT";}

SCOM - Move Agents to another Management Server

SCOM - Move Agents to another Management Server

There are times when you may need to move your agents from one management server to different management server.

This is easily done by right clicking the agent and select Change Primary Management Server.

The problem is that when a agent is manually installed and approved, the Remotely Manageable flag which allows the options Change Primary Management Server, Repair and Uninstall to be used is set to NO. Because this flag is set to NO those options will be greyed out. You could change the database to set the flag to YES but there is a easier solution. Powershell!


In order to move the agents to a different management server first put the agents you want in maintenance mode then open your Operations Manager Shell and follow these steps:

This will move all agents managed by $serverfrom to $serverto

$serverfrom = Get-ManagementServer | ? {$_.name -eq "FQDN of the Server you are moving the agents from"}
$agents = Get-Agent -ManagementServer $serverfrom
$serverto = Get-ManagementServer | ? {$_.name -eq "FQDN of the Server you are moving the agents to"}
Set-ManagementServer -AgentManagedComputer:$agents -PrimaryManagementServer:$serverto


If you want to move only one or a few you can move them like this:

$agent = Get-Agent -ManagementServer $serverfrom | ? {$_.name -eq "FQDN of the agent"}
or

$agent = Get-Agent -ManagementServer $serverfrom | ? {$_.name -match "some pattern that will match the agents you want"}

Then when you are finished bring the agents back from maintenance mode. 

SCCM - Apply updates during Build and Capture Task Sequence. No WSUS Integration.

SCCM - Apply updates during Build and Capture Task Sequence. No WSUS Integration.

If you have a WSUS in your environment but it's not integrated with SCCM you can use the MDT method.

You will need the ZTIWindowsUpdate.wsf that's part of MDT.

Then you can either Run Command Line during the Task Sequence or Install Software (if you import the script as a package).

I just created a package with all MDT scripts and a program to run the ZTIWindowsUpdate.wsf


In MDT the Task Sequence would read the value of WsusServer from the customsettings.ini file.

In SCCM you will need to create a variable with this value in the collection you are targetting the Task Sequence.

To create the variable right click the collection you will advertise the Task Sequence and click on Modify Collection Settings.


Select the Collection Variables tab.


In the Name field type WsusServer and in the value field type your WSUS server name. Note that the http:// is mandatory.


And you are done.